As part of your design process, you'll need to start with a block diagram, circuit schematic, and eventually a PCB layout
Home
› Build Your Own Queen Size Headboard - Build a Queen Headboard - YouTube / Even if you don't have any fencing on hand, you can make this beautiful headboard for about $25 depending on where you purchase the cedar pickets.
Build Your Own Queen Size Headboard - Build a Queen Headboard - YouTube / Even if you don't have any fencing on hand, you can make this beautiful headboard for about $25 depending on where you purchase the cedar pickets.
Build Your Own Queen Size Headboard - Build a Queen Headboard - YouTube / Even if you don't have any fencing on hand, you can make this beautiful headboard for about $25 depending on where you purchase the cedar pickets.. Wall art, room dividers, fabric wall hangings, and even a wall decal can create the look of a headboard, with no carpentry skills required. Don't let the name scare you. You'll want to go off the dimensions of your mattress and make it the height you want, but to give you an idea this fabric headboard is for a king bed and the dimensions of the headboard are 74 inches wide and 48.5 inches tall. Use a 2×2 as a frame and nail the planks into position. Make the end flush so top of the post so the top of the headboard will sit on both the 4×4 and the 1×2.
Don't let the name scare you. The 1x4s, 2×4 and 2×6 on the headboard, the bed slats, and the 2×6 on the headboard. To make this wooden headboard, cut a few planks of pine and sand them. It doesn't matter what size bed you have, this project can work for a king, queen, full or twin sized bed. For more information on how we made this, check out my blog here:
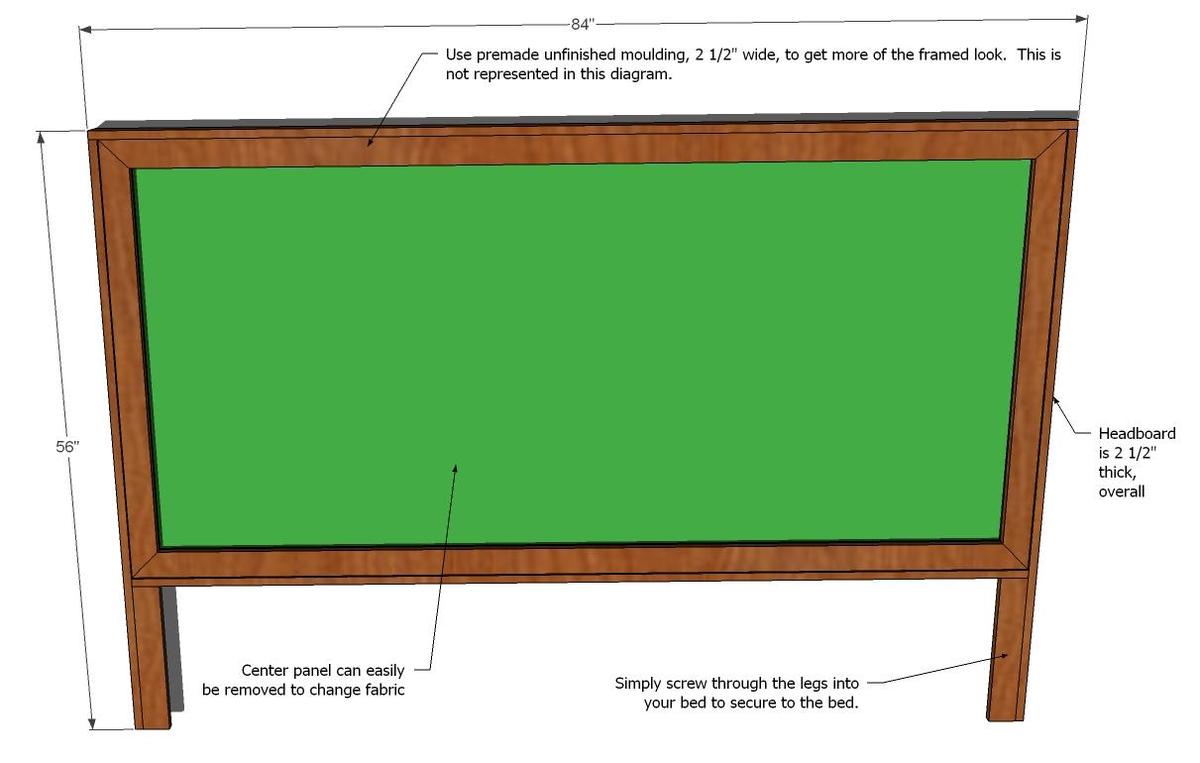
King Size Framed Upholstered Headboard | Ana White from www.ana-white.com Make the end flush so top of the post so the top of the headboard will sit on both the 4×4 and the 1×2. Price and stock could change after publish date, and we may make money from these links. Insert three 11 1/4 inch by 8 1/2 inch piece as shelves inside the box at 1, 11 and 21 inches above the base. To build a twin size bed frame, reduce 21 inches on the length of all the horizontal components: This diy wooden headboard project from ana white uses reclaimed or new wood to create a headboard for any size of bed, including twin, double, queen, and king. Simple headboards are 2 to 4 inches thick, while headboards with storage are 7 to 10 inches thick. Take one each of 47 1/4 inch by 12 inch piece, 35 1/4 inch by 12 inch piece and 35 1/4 inch by 8 1/2 inch piece and attach to form a u shaped box. Clamp the top support down to your work table and align the uprights with one on the left, one on the right and the other 30 inches into the center.
Approximately 1 inch from the edge, attach one 1×2 to the 4×4 at the end you wish to be the top of the headboard running the length of the 4×4.
Simple headboards are 2 to 4 inches thick, while headboards with storage are 7 to 10 inches thick. Apply glue to the top of the headboard. Once all of my wood was cut down to size, it was time to build the sideboards and headboard. Clamp the top support down to your work table and align the uprights with one on the left, one on the right and the other 30 inches into the center. Up to 70% off our top sellers. Use another 1 piece of wood as a spacer if need be. Price and stock could change after publish date, and we may make money from these links. Great selection and prices on queen head board. See more ideas about headboard, diy headboard, diy headboards. Some diy headboards aren't boards at all. For more information on how we made this, check out my blog here: I used wood glue and 1 1/4″ brad nails to add the trim to the sideboard pieces. Cut the wood or other headboard material into the dimensions that match your bed.
Then finally, join it to the legs, fit it to the bed and finalize the building. For a king size bed, use 80x40 dimensions and 42x40 dimensions for a twin size bed. This project will only take you an afternoon and can be a great budget project if you use reclaimed wood. There are more than 15 free queen size bed plans here, many of these plans can be customized so you can get exactly what you want. Cut the wood or other headboard material into the dimensions that match your bed.
Ageless 5 panel king size headboard | Hometalk from cdn-fastly.hometalk.com The next step is to process your red oak lumber and build a backboard. Wall art, room dividers, fabric wall hangings, and even a wall decal can create the look of a headboard, with no carpentry skills required. See more ideas about headboard, diy headboard, diy headboards. Second, plan your work to determine the dimensions. Even if you don't have any fencing on hand, you can make this beautiful headboard for about $25 depending on where you purchase the cedar pickets. Create the inset assemble the pieces, remembering that the side with the pocket holes will be the backside. If you want to build your own, they can become hopelessly complicated and cost a lot of money. Make the end flush so top of the post so the top of the headboard will sit on both the 4×4 and the 1×2.
The thickness depends on your preference for the type of headboard.
To do it, just staple together a couple of sets of matching jute placemats and table runners onto a wall and presto, new headboard. Google is your friend, folks and it hasn't let me down yet, so that was the natural course of action. Building a headboard can be intimidating, but it is one of the easiest projects if you're new to building furniture. You'll want to go off the dimensions of your mattress and make it the height you want, but to give you an idea this fabric headboard is for a king bed and the dimensions of the headboard are 74 inches wide and 48.5 inches tall. You will also want to choose a stain color or just sheer coat it if you love the look of cedar. Insert three 11 1/4 inch by 8 1/2 inch piece as shelves inside the box at 1, 11 and 21 inches above the base. Second, plan your work to determine the dimensions. Wall art, room dividers, fabric wall hangings, and even a wall decal can create the look of a headboard, with no carpentry skills required. See more ideas about headboard, diy headboard, diy headboards. I used wood glue and 1 1/4″ brad nails to add the trim to the sideboard pieces. Make the end flush so top of the post so the top of the headboard will sit on both the 4×4 and the 1×2. Don't forget to sand, stain, and seal the board to create a smooth finish. A headboard is a furniture piece that not too many of your houseguests will see, but it is something that you should take pride in every time you walk into your bedroom.
Google is your friend, folks and it hasn't let me down yet, so that was the natural course of action. Next, i moved on to building the headboard. Even if you don't have any fencing on hand, you can make this beautiful headboard for about $25 depending on where you purchase the cedar pickets. We made this headboard frame the same width as. Queen headboards range from 60 to 64 inches wide by 28 to 48 inches tall.
Farmhouse Queen Headboard (Pine) | Do It Yourself Home Projects from Ana White | Diy wood ... from i.pinimg.com A headboard is a furniture piece that not too many of your houseguests will see, but it is something that you should take pride in every time you walk into your bedroom. Up to 70% off our best products Next, i moved on to building the headboard. Queen size bed woodworking plans below include instructions for building, images, drawings and some include comments, tips, and videos to make building your bed easy. The 1x4s, 2×4 and 2×6 on the headboard, the bed slats, and the 2×6 on the headboard. For this project, we are making a queen size bed with 64x40 dimensions. Even if you don't have any fencing on hand, you can make this beautiful headboard for about $25 depending on where you purchase the cedar pickets. Up to 70% off our top sellers.
The thickness depends on your preference for the type of headboard.
For more information on how we made this, check out my blog here: How to make a tufted wingback headboard 32 steps. To do it, just staple together a couple of sets of matching jute placemats and table runners onto a wall and presto, new headboard. Create the inset assemble the pieces, remembering that the side with the pocket holes will be the backside. Approximately 1 inch from the edge, attach one 1×2 to the 4×4 at the end you wish to be the top of the headboard running the length of the 4×4. For this project, we are making a queen size bed with 64x40 dimensions. Use a 2×2 as a frame and nail the planks into position. Then finally, join it to the legs, fit it to the bed and finalize the building. And reduce 6 inches on the length of the 2×6 side rails and 2×4 stringer ( you only need one stringer because the twin bed is a lot narrower. Some diy headboards aren't boards at all. Queen headboards range from 60 to 64 inches wide by 28 to 48 inches tall. I used wood glue and 1 1/4″ brad nails to add the trim to the sideboard pieces. Take one each of 47 1/4 inch by 12 inch piece, 35 1/4 inch by 12 inch piece and 35 1/4 inch by 8 1/2 inch piece and attach to form a u shaped box.